

This is a small guide to setup your Linux desktop to view 360 degree interactive photos - also called photospheres - and panoramas in Linux.
Regular image viewers generally don’t support 360 images. There are very few native Linux viewers out that that supports them. The best I know of are:
SphereView is available as a Flatpak for amd64 and arm64 platforms (I use both myself), while the author of Lux provides packages and AppImages but only for amd64.
What’s more, I prefer the way SphereView uses the mouse to pan and tilt. So I recommend SphereView.
To install it, open a terminal and simply install the Flatpak from Flathub:
flatpak install io.github.dynobo.sphereview
And that’s pretty much it for the basic installation: when you want to view a 360 image, right-click on it, select Open with, then select the SphereView application (your mileage may vary depending on the particular file manager you use, but this seems fairly universal).
But what if you want to automatically open a 360 image in SphereView and a flat image in your regular image viewer?
Unfortunately, SphereView doesn’t render flat images correctly, so you can’t use it as your default image viewer. But it’s possible to write a small “shim” script that replaces the default image viewer, that inspects the image(s) the viewer is supposed to open, determines those that are flat and those that are spherical, then opens the flat images in the regular viewer and the spherical images in SphereView.
To do this:
- Install
zenityandexiftool. On a Debian-based system for example, do:
sudo apt install zenity exiftool
- Create a text file called
auto_open_image_as_normal_or_photosphere.shin your path with the following content:
#!/bin/bash

FLATIMG_VIEWER="gtk-launch org.gnome.gThumb.desktop"
PHOTOSPHERE_VIEWER="gtk-launch io.github.dynobo.sphereview.desktop"

if [ $# -eq 0 ]; then
  IFS='|' read -ra ARGS <<< $(zenity --title "Choose one or more JPEG images to view" --multiple --file-selection --file-filter="*.jpg *.jpeg *.JPG *.JPEG")
else
  ARGS=("$@")
fi

FLATIMGS=()
PHOTOSPHERES=()

for FILE in "${ARGS[@]}"; do
  if exiftool -X -xmp:ProjectionType "${FILE}" | grep -i ProjectionType > /dev/null 2> /dev/null; then
    PHOTOSPHERES+=("${FILE}")
  else
    FLATIMGS+=("${FILE}")
  fi
done

if [ ${#FLATIMGS[@]} -gt 0 ]; then
  ${FLATIMG_VIEWER} "${FLATIMGS[@]}"
fi

if [ ${#PHOTOSPHERES[@]} -gt 0 ]; then
  echo TOTO
  ${PHOTOSPHERE_VIEWER} "${PHOTOSPHERES[@]}"
fi
I like to put all my scripts in a ~/scripts directory in my home directory that I added to my PATH. What follows assumes the script resides in /home/user/scripts.
Also, the script - and the explanations below - assume spherical images are only in JPEG format. I only use JPEG for photospheres personally. If you use other formats, adapt the script and the installation as needed.
This script assumes you have Gtk installed, and your default image viewer is gThumb. Replace the xdg launcher gtk-launch and/or the viewer org.gnome.gThumb to the launcher and image viewer of your choice.
If you want to reuse the default image viewer to view JPEG images, you can find out which one it is currently set to by doing:
xdg-mime query default image/jpeg
- Make the script executable:
chmod +x ~/scripts/auto_open_image_as_normal_or_photosphere.sh
- The script needs a .desktop entry so it can be used as the new default application for the
image/jpegmimetype: create~/.local/share/applications/auto_open_image_as_normal_or_photosphere.desktopwith the following content:
[Desktop Entry]
Name=Automatically open image as a normal image or as a photosphere
Exec=/home/user/scripts/auto_open_image_as_normal_or_photosphere.sh %U
MimeType=image/jpeg
Terminal=false
Type=Application
- Finally, change your default viewer for the
image/jpegminetype to the script:
xdg-mime default auto_open_image_as_normal_or_photosphere.desktop image/jpeg
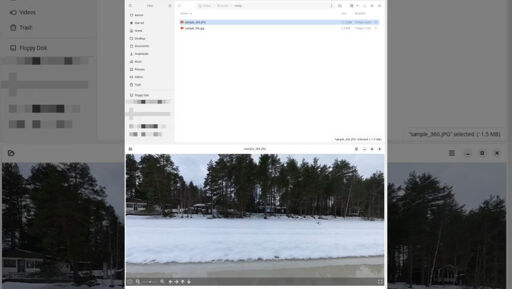
And that’s it! Now when you open an image in your file manager, SphereView will be used to view it if it’s a properly-formatted 360° image, as shown in the video.
You must log in or register to comment.
There is also this plugin for Eye of GNOME image viewer https://github.com/Aerilius/eog_panorama
I just tried it: I had to modify the main .py file so it uses Webkit 4.1 instead of 4.0 (that’s the version I have installed) and it works. But for some reason, photo spheres are only displayed properly if there was no Eye of Gnome instance already running: if there’s already an image up, the second photo sphere remains displayed as a flat photo.
Also, the pan / tilt mouse movements are a bit scratchy. It’s probably because the engine underneath is Javascript.
Other than that, it works well. Thanks!
I actually forget what it worked like. I installed it when I had my Essentials PH1 phone, with the 360 camera add on module. But the battery died on that too many years ago now